A default Enrollment Status Page policy is created within the Windows enrollment settings, but minimal settings are configured. It carries the lowest priority and will be applied to all users and all devices.
To create a new Enrolment Status Page profile in which you can configure the settings, follow these steps.
- Sign in to the Microsoft Intune admin center (https://endpoint.microsoft.com/) as a Global Administrator.
- Select Devices.
- Under By platform, select Windows > Windows enrollment > Enrollment Status Page.
- Select Create.
- In Basics, enter the following properties:
• Name: Name your profile.
• Description: Enter a description for the profile. - Select Next.
- In Settings, configure the following settings:
• Show app and profile configuration progress: Your options are
• No The enrollment status page doesn’t appear during device OOBE. Select this option if you don’t want to show the ESP to users.
• Yes The enrollment status page appears during device OOBE. - When you select Yes to Show app and profile configuration progress, the following additional settings are available:
• Show an error when installation takes longer than specified number of minutes: The default time-out is 60 minutes. Use this setting to allow more time to install apps on your devices.
• Show custom message when time limit or error occur: Include a message that tells your users who to contact for help. Your options are
• No The default message is shown to users when an error occurs: “Setup could not be completed. Please try again or contact your support person for help.”
• Yes Your custom message is shown to users when an error occurs. Enter your message in the provided text box.
• Turn on log collection and diagnostics page for end users: The user’s logs and diagnostics could aid with troubleshooting, so we recommend turning this on. Your options:
• No The Collect logs button isn’t shown to users when an installation error occurs. The Windows Autopilot diagnostics page isn’t shown on devices running Windows 11.
• Yes The Collect logs button is shown to users when an installation error occurs. The Windows Autopilot diagnostics page is shown on devices running Windows 11.
• Only show page to devices provisioned by out-of-box experience (OOBE): Use this setting to stop the enrollment status page from reappearing to every new user who signs into the device. Your options are
• No The enrollment status page is shown during the device phase and the out-of-box experience (OOBE).
• Yes The enrollment status page is shown during the device phase and the OOBE. It is not shown to subsequent users who sign in to the device.
• Block device use until all apps and profiles are installed: Your options are
• No Users can leave the ESP before Intune has finished setting up the device.
• Yes Users can’t leave the ESP until Intune has finished setting up the device. This option unlocks additional settings for this scenario.
• Allow users to reset device if installation error occurs: Your options are
• No The ESP doesn’t give users the option to reset their devices when an installation fails.
• Yes The ESP gives users the option to reset their devices when an installation fails.
• Allow users to use device if installation error occurs: Your options are
• No The ESP doesn’t allow users to bypass the ESP when an installation fails.
• Yes The ESP allows users to bypass the ESP and use their devices when an installation fails.
• Block device use until these required apps are installed if they are assigned to the user/device: Your options are
• All All assigned apps must be installed before users can use their devices.
• Selected The selected apps must be installed before users can use their devices. Choose Select apps to start a Blocking apps list. This option unlocks the Blocking apps settings.
• Only fail selected blocking apps in technician phase: Use this setting with Windows Autopilot pre-provisioned deployments to control how your required apps are prioritized during the technician flow. - Select Next.
- In Assignments, select the groups, users, or devices that will receive your profile. Optionally, select Edit filter to restrict the assignment further.
- Select Next.
- In Scope Tags, assign a tag to limit profile management to specific IT groups defined using a tag.
- Select Next.
- In Review + create, review your settings.
- Select Create. Your changes are saved, and the profile is assigned.
- The profile will be applied the next time devices check in with Intune. On the Enrollment Status Page profile list, the new profile is listed first and assigned a Priority of 1, meaning it will take precedence over the default profile, as shown in Figure 1-9.
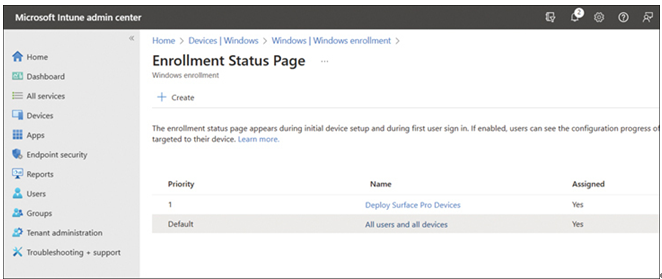
FIGURE 1-9 The Enrollment Status Page profile list
- If you assign a user or device more than one ESP profile, the profile with the highest priority takes precedence over the other profiles. The profile set to 1 has the highest priority. To modify the priority of a profile, you can assign more than one ESP profile to a user or device. The profile with the highest priority takes precedence over the other profiles. The profile set to 1 has the highest priority. To modify the priority of a profile, follow these steps:
• Hover over the profile in the list with your cursor until you see three vertical dots.
• Drag the profile to the desired position in the list.