With the hardware ID for each device, you need to import the information into one of the cloud-based administration centers and then synchronize this information to the Windows Autopilot deployment service.
Devices must be known to Azure AD and registered to your tenant before you can provision the devices using Autopilot.
There are several administrative portals that you can use to import the hardware device IDs. However, generally, you’ll use one of the following:
- Microsoft Endpoint Manager admin center
- Microsoft Intune admin center
- Microsoft Store for Business
Use the following procedure to add Windows Autopilot devices to a Microsoft 365 tenant by importing a CSV file with its information:
- Sign in to the Microsoft Intune admin center (https://endpoint.microsoft.com/) as a Global Administrator.
- Select Devices, select Enroll devices, and then under Windows Autopilot Deployment Program, select the Devices tile.
- On the Windows Autopilot Devices page, select Import.
- On the Add Autopilot devices blade, browse to a .csv file containing the hardware IDs of the devices you want to add, and select Open.
- If the imported file displays as correctly formatted, select Import. It can take up to 15 minutes to import and process the file contents. On the Windows Autopilot Devices page, the banner should indicate that the import is in progress and show the elapsed time.
- When the import process has been completed, select Sync on the menu bar. A banner should indicate that synchronization is in progress. The process might take a few minutes, depending on how many devices are synchronized.
- Once the sync process has been completed, you will see a notification indicating whether the sync was successful and whether some devices have not been imported. Select Refresh to see the new devices added, as Figure 1-8 shows.
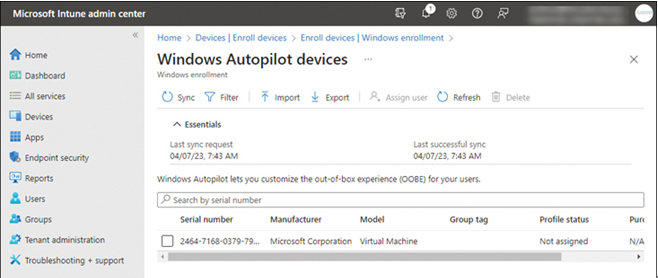
FIGURE 1-8 Importing Windows Autopilot Devices
- After you’ve imported the relevant device IDs, you can optionally assign specific devices to users. On the Windows Autopilot devices page, select the device checkbox, and then select Assign user on the toolbar.
- On the Select user blade, choose the appropriate user, and then click Select.
- On the device ID blade, select Save.
Set up the Enrolment Status Page
The Enrolment Status Page (ESP) is useful for the end user as it can show them the status of the configuration of their device. Every device that joins Azure AD during the OOBE phase will have an Enrolment Status Page (ESP) shown. With Windows Autopilot, you can configure this page to show the user progress information and to ensure the device is in the expected state before the user can access the desktop for the first time.
The ESP allows you to set various configurations that apply during a Windows Autopilot deployment. You can use the ESP to interact with the user in the following ways.
- Display the installation progress
- Block device use until the required apps are installed
- Display time limits
- Track the installation status of applications, security policies, certificates, and network connections
- Display troubleshooting operations available and collect troubleshooting logs